CMS integrations
HubSpot
GrowGanic publishes each finished article to your HubSpot blog, with tags resolved and meta fields set.
A primary destination. Your article lives here and the canonical URL points at it, so this is the site Google credits. About 1 minute, in one click.
#What connecting does
Every article GrowGanic finishes is created as a post on your HubSpot blog and published on your own domain, with its tags, meta title, meta description and hero image set.
GrowGanic finds your blog for you. An account with one blog connects to it straight away; an account with several is asked once which blog to use. You are never asked for a blog id, because HubSpot's own interface never puts one in front of you.
HubSpot connects through HubSpot's own authorization screen and nothing else. There is no key to create and nothing to paste: you approve GrowGanic in HubSpot, and you can withdraw that approval from your HubSpot settings at any time.
Articles publish on your own domain, so the ranking credit belongs to your site, not to ours.
#Before you start
- A blog on your HubSpot account. HubSpot refuses a post with no parent blog, and this is the most common reason a first article fails. No blog yet? In HubSpot open Content, then Blog, and click Start from scratch: that creates it, and you can close the editor right away.
- Super Admin or App Marketplace access permissions in that HubSpot account. HubSpot requires one of them to install an app.
- A GrowGanic account with your site added. The connection is made from GrowGanic's Integrations page.
- A blog author helps but is not required. HubSpot needs one on a published post, so GrowGanic uses the first author it finds, and adds one named after your business when the account has none.
#Install and connect
In one click
- Open Integrations in GrowGanic, choose HubSpot and click Connect HubSpot. Coming from the HubSpot App Marketplace? Click Install on the GrowGanic listing. It brings you to GrowGanic: create an account (or sign in) and add your site, and GrowGanic opens Integrations with HubSpot ready to connect.
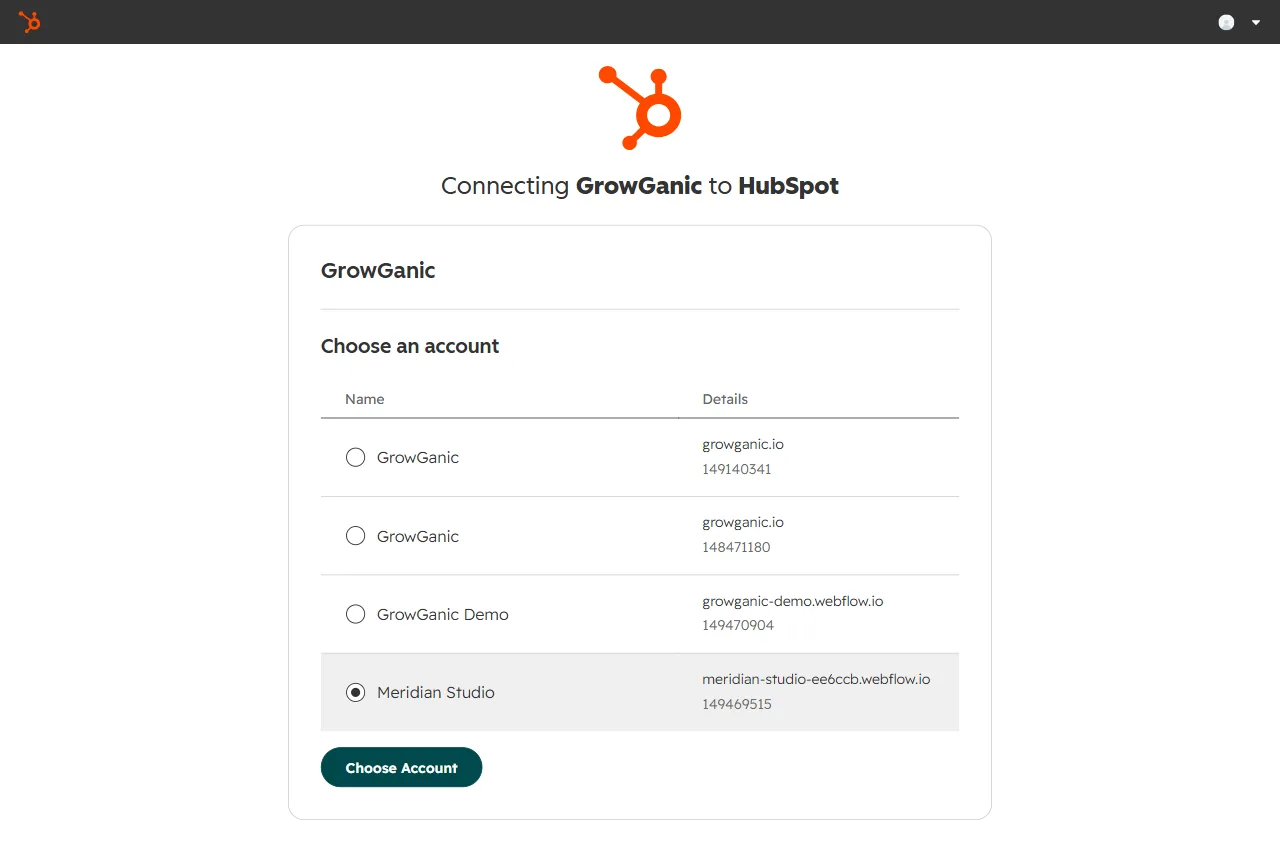
- HubSpot asks which account to connect. Choose the account whose blog your articles belong on, then click Choose Account.
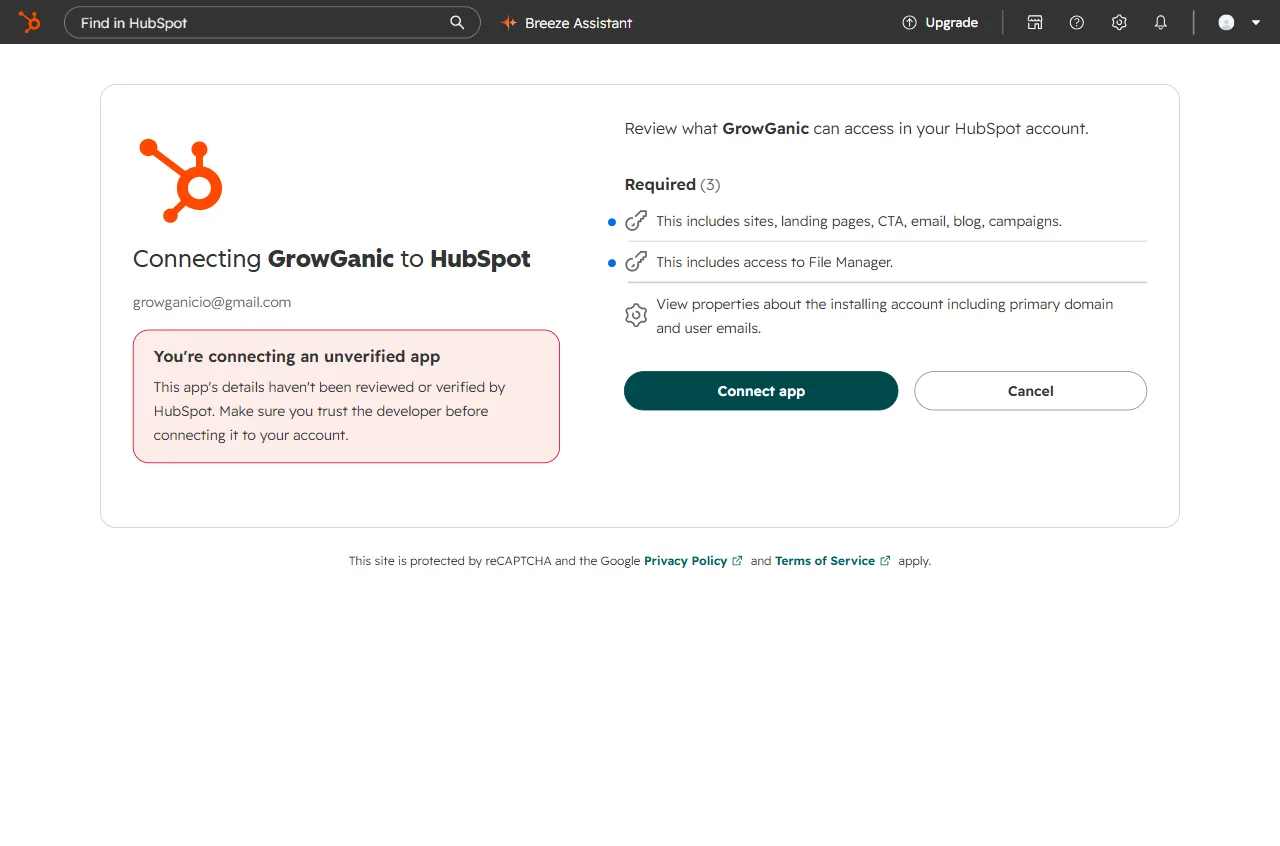
- HubSpot lists the three permissions GrowGanic asks for, each explained under Permissions below. Review them and click Connect app. Nothing is typed and no key is ever created.
- You land back on Integrations in GrowGanic with HubSpot connected and Active. GrowGanic finds your blog on its own, and asks you to pick one only when your account has more than one.
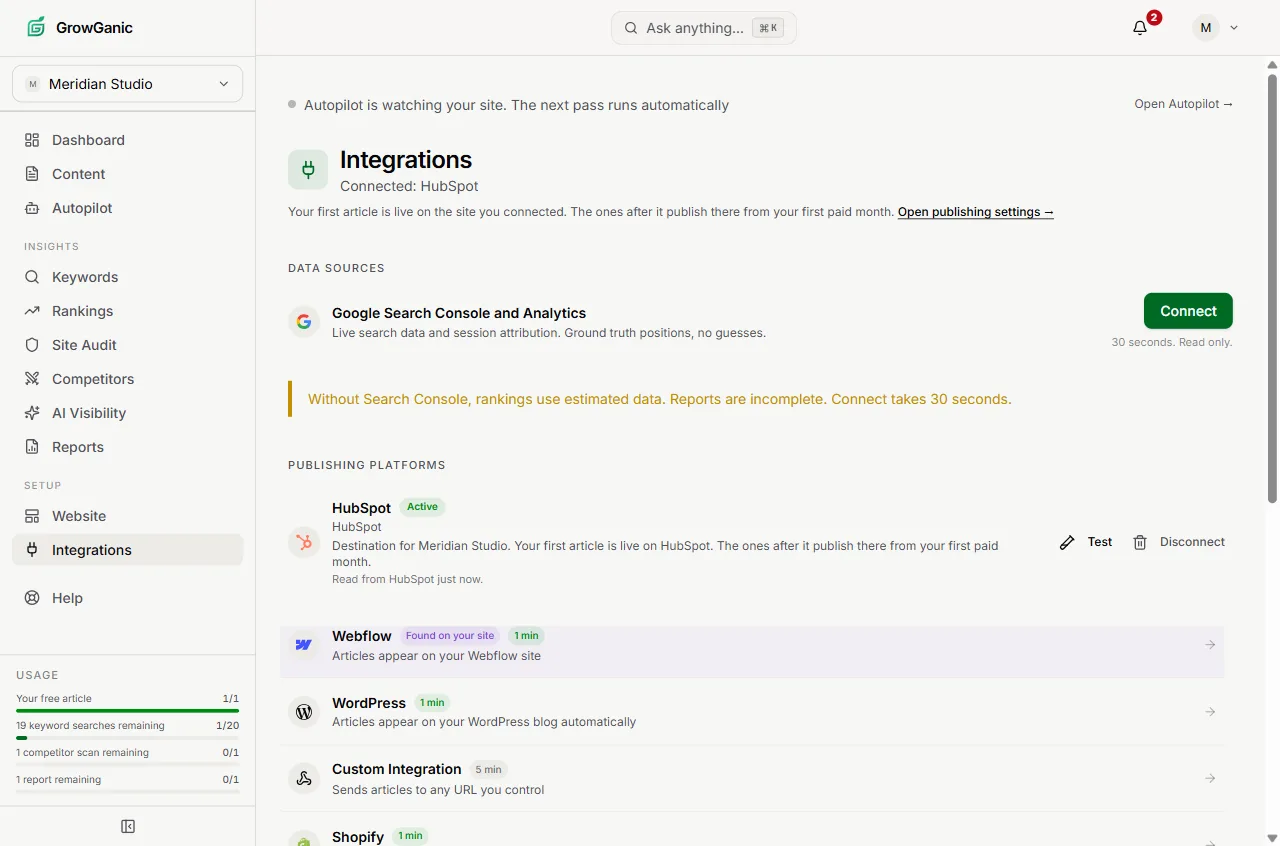
That is it. Articles publish to your HubSpot blog on their own from then on, and nothing ever needs re-approving: GrowGanic renews its access in the background.
#Configure
Nothing has to be set before articles start arriving. GrowGanic chooses the blog and the author when you connect.
Blog. An account with one blog is connected to it straight away. An account with several blogs is asked once, right after HubSpot's permission screen, which blog the articles belong on.
Author. Posts are published under the first blog author on your HubSpot account. When the account has none, GrowGanic adds one named after your business. You can change a post's author in HubSpot, and GrowGanic leaves it as you set it.
Live or drafts. On the Autopilot page in GrowGanic, choose Send to HubSpot as drafts instead to review each article in HubSpot before it goes live, or Publish automatically to HubSpot to let articles go live on their own. The HubSpot row on the Integrations page always says which applies to you.
Pause. Pause autopilot on the same page to stop new articles without disconnecting HubSpot.
#How to use it
On autopilot
- Autopilot finds the topics, writes each article and publishes it to your HubSpot blog on its schedule. You do not have to open GrowGanic for that to happen.
- Each article arrives as one post, with its title, body, slug, meta title, meta description, hero image and tags already set.
Yourself
- Every article is under Content in GrowGanic. Open one to read or edit it. An article that arrived as a draft can be published from its page in GrowGanic, or from HubSpot.
- Editing an article in GrowGanic updates the same HubSpot post. It replaces the post's title, body, slug, meta fields, hero image and tags with GrowGanic's version, and never creates a second post.
- Changes you make to a post in HubSpot are kept until GrowGanic updates that article again.
- Click Test on the HubSpot row in Integrations at any time to check that the connection still works.
#Permissions we ask for
Every permission below is used by a call GrowGanic actually makes. We ask for nothing we do not use.
| Permission | Used for | Why |
|---|---|---|
| content | Reading your blog, its authors and its tags; creating, updating, publishing and deleting the posts GrowGanic writes; creating a tag that does not exist yet; adding a blog author named after your business when the blog has none | This is the publishing itself. HubSpot's screen describes this permission broadly (sites, landing pages, CTA, email, blog, campaigns) because one permission covers all of its content tools. GrowGanic only calls HubSpot's blog endpoints with it. |
| oauth | Learning which HubSpot account the connection belongs to | HubSpot requires every app that uses its authorization screen to ask for it. GrowGanic uses it once, when you connect, to read the account id and the permissions you granted. |
| files | Uploading each article's hero image | Uploads each article's hero image into a GrowGanic folder in your File Manager and sets it as the post's featured image, so the image belongs to your account. |
GrowGanic asks for blog publishing and nothing else in your CRM. It requests no access to your contacts, companies, deals, tickets, forms or workflows, and could not read any of them with the token it holds.
#What we write
| Field | What goes in it |
|---|---|
| name | The article title. |
| postBody | The article body as HTML. |
| slug | The article slug, or one derived from the title. |
| htmlTitle | The meta title, or the article title when there is none. |
| metaDescription | The meta description, or the excerpt when there is none. |
| featuredImage | The hero image, uploaded to your File Manager. |
| featuredImageAltText | The hero image's alt text. |
| tagIds | Your article's tags, resolved to HubSpot tag ids and created where missing. |
| blogAuthorId | The blog author the post is published under. |
| contentGroupId | The blog the post belongs to. |
| state | PUBLISHED, or DRAFT when you have asked for drafts. |
Fields your setup does not have are skipped rather than guessed at, and the article publishes with the ones it does have.
The hero image
Each article's hero image is uploaded into a GrowGanic folder in your HubSpot File Manager and set as the post's featured image, so the image belongs to your account rather than to ours.
The alt text is the article's meta description, or its excerpt or title when there is none, capped at 200 characters.
#Publishing behaviour
GrowGanic's access token lasts thirty minutes and is renewed automatically with the refresh token HubSpot issued when you connected. Nothing needs re-approving.
Because that token is short-lived, a Test click that finds it expired is not treated as a broken connection: the token is renewed and the connection stays on. A button called Test must never be the thing that breaks what it is testing.
Editing an article in GrowGanic updates the same post. It never creates a second one.
If this destination is ever unreachable, the article is not held. It publishes to your GrowGanic blog and moves here on its own once the connection is healthy again. GrowGanic never holds a finished article back waiting for you.
#Disconnect
Disconnecting stops publishing to HubSpot. Posts already on your HubSpot blog stay published and stay yours: GrowGanic deletes nothing in HubSpot.
Disconnecting removes the connection from GrowGanic, not the app from HubSpot. GrowGanic stays listed under Connected Apps in your HubSpot account until you uninstall it there, as the next section shows, but with its tokens deleted it has nothing left to call HubSpot with.
Open Integrations in GrowGanic, find this destination and click Disconnect. The stored credential is deleted from our database in the same step, not marked inactive. Articles already published stay exactly where they are, and they are yours.
#Uninstall from HubSpot
- In HubSpot, click the settings icon in the top navigation bar, then in the left sidebar open Integrations, then Connected Apps.
- Find GrowGanic, click Actions, then Uninstall.
- Type uninstall in the dialog box and click Uninstall.
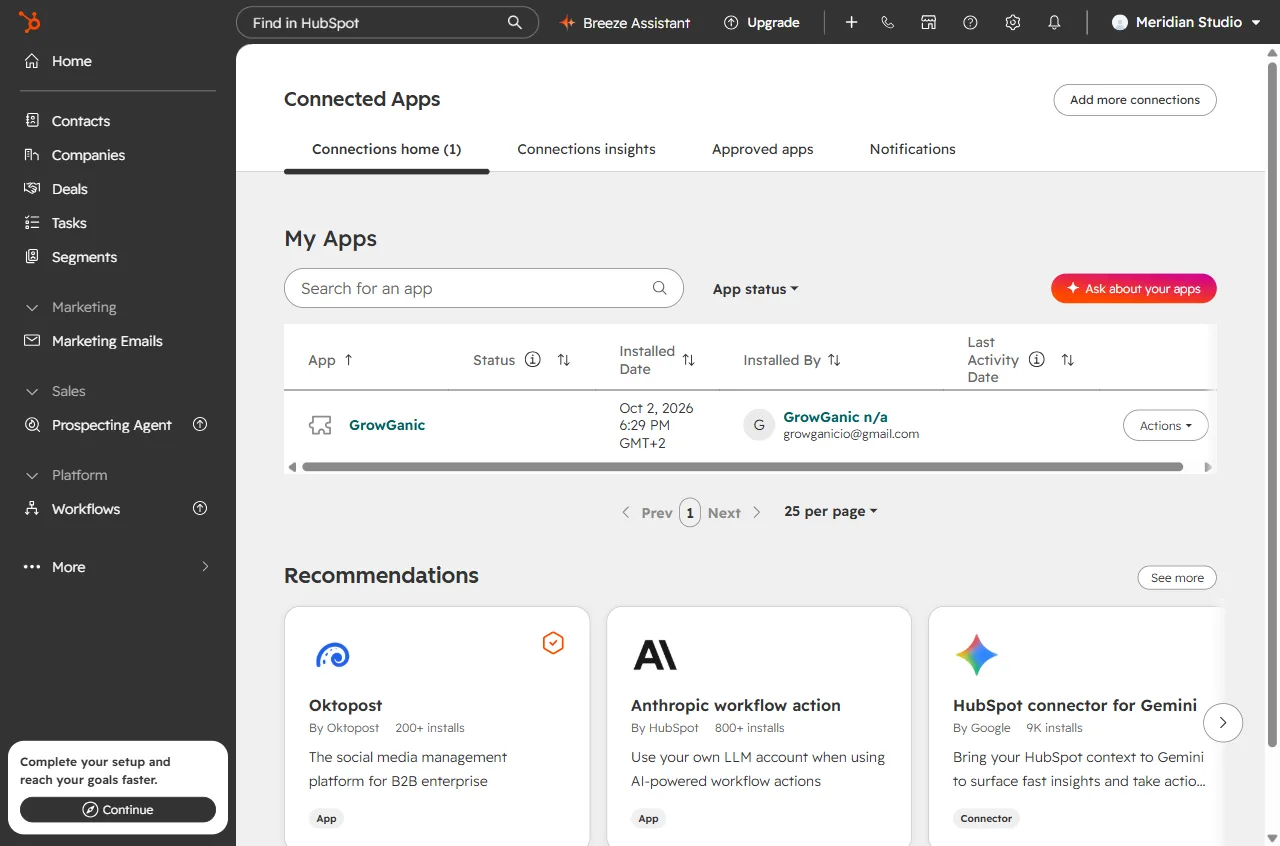
Uninstalling ends GrowGanic's access to your HubSpot account. Posts GrowGanic already published stay on your blog, and your articles stay in your GrowGanic account. What happens to the stored connection is in the next section.
To use GrowGanic with HubSpot again later, connect from Integrations in GrowGanic as above.
HubSpot's own guide: Connect apps to your HubSpot account, under Uninstall an app.
#What happens to your data
What GrowGanic stores about your HubSpot account
- The access token and the refresh token HubSpot issues when you click Connect app, encrypted with AES-256-GCM before they are written to our database. The access token expires after thirty minutes; the refresh token is what renews it.
- Your HubSpot account id, the id of the blog your articles go to, and the id of the blog author they are published under.
- The permissions HubSpot granted, when the connection was made, which GrowGanic user made it, and whether it is working.
- For each article delivered to HubSpot, the post's id and its public address, so an edit updates the same post instead of creating a second one.
- Nothing else. GrowGanic does not read or store your contacts, companies, deals, tickets, forms or any other record in your HubSpot CRM.
When you disconnect in GrowGanic
- The connection is deleted from our database in the same step: both tokens, your HubSpot account id, the blog id and the author id.
- Nothing in HubSpot is changed or deleted. Posts already published stay on your HubSpot blog, and their hero images stay in your File Manager.
- Your articles stay in your GrowGanic account, and each one keeps the record of the HubSpot post it was published as.
- The app stays installed in HubSpot until you uninstall it there.
When you uninstall GrowGanic in HubSpot
- HubSpot ends GrowGanic's access, and the refresh token stops working.
- GrowGanic asks HubSpot to renew its thirty-minute access token before it publishes, whenever the current token is close to expiring, and every time you click Test. The first renewal after an uninstall is refused, and GrowGanic then switches the HubSpot connection off, deletes both tokens from our database and emails you that HubSpot needs reconnecting.
- Until that renewal the tokens stay in our database, encrypted.
- The switched-off HubSpot row stays on your Integrations page with no token in it, so you can see what happened and reconnect in one click. Click Disconnect to remove it as well.
- Posts already published stay on your HubSpot blog with their hero images in your File Manager, and your articles stay in your GrowGanic account. New articles publish to your GrowGanic blog until HubSpot is connected again.
#Troubleshooting
| What you see | Why | Fix |
|---|---|---|
| Your HubSpot portal has no blog yet, so nothing was connected. | The HubSpot account you picked has no blog for a post to belong to. | In HubSpot open Content, then Blog, and click Start from scratch. That creates the blog, and you can close the editor right away. Then click Connect HubSpot again. |
| HubSpot needs a blog author before it accepts a live post. | The blog has no author, and HubSpot refused the one GrowGanic tried to add. | In HubSpot open Content, then Blog, and add an author. Nothing is lost meanwhile: your article is on your GrowGanic blog and GrowGanic sends it to HubSpot again once an author exists. |
| HubSpot no longer accepts this connection. | GrowGanic was uninstalled in HubSpot or its access was withdrawn, so HubSpot refused to renew GrowGanic's token. | Open Integrations in GrowGanic and click Reconnect on the HubSpot row, then approve on HubSpot's screen. Nothing has to be typed. |
| HubSpot has not granted GrowGanic permission to write blog posts. | The content permission was not granted, or the account you picked cannot publish to its blog. | Click Reconnect on the HubSpot row and approve all three permissions on HubSpot's screen. If HubSpot will not let you, ask a Super Admin of the account to connect it. |
| HubSpot could not find the blog this connection points at. | The blog was deleted or replaced in HubSpot. | Click Reconnect on the HubSpot row and approve again. GrowGanic finds the current blog, and asks which one when there are several. |
Still stuck? Email hey@growganic.io and tell us the sentence you are seeing. Or read the other destinations.